How To Add Facebook Comment Box To Blogger. ?
Part 1:- Create App For Facebook Comment Box.
- First of all you need to create an app on Facebook. If you know how, simple visit below given link.

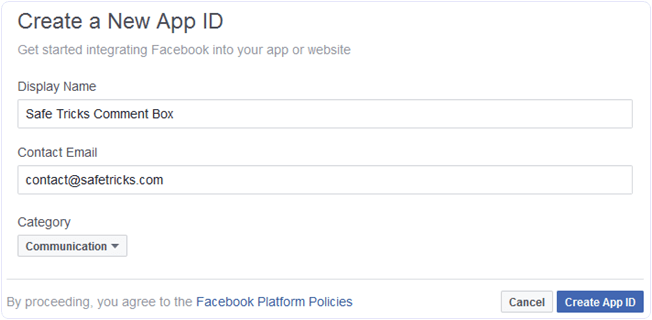
- Then Popup Window will appear to fill details regarding Facebook app.
- Fill Display name, Contact Email and select category and after that click on create App ID.
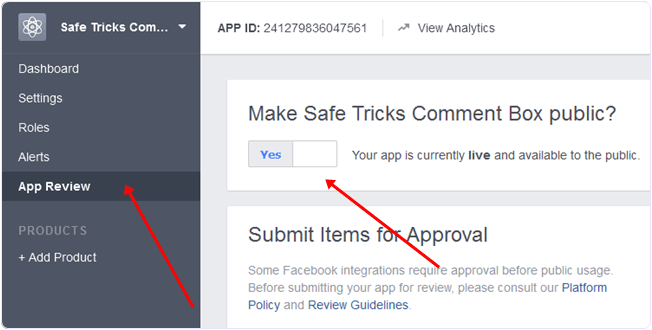
Within few secs new app will get created. Now you have to change app review status from developer mode to public as show below.
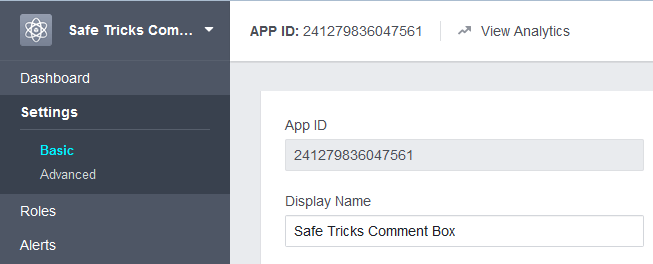
Now Copy Paste App ID For using in further steps. If are unable to find simple locate as shown below.
Part 2:- Settings For Blogger According To Facebook Plugins.
- Open Your Blogger Template section of Blog >> Then Edit HTML.
- Now Search for <html and Replace it with below code.
<html xmlns:fb='http://www.facebook.com/2008/fbml'Now Search <head> and paste below code just below searched tag.<meta expr:content='data:blog.pageTitle' property='og:title'/>
<meta expr:content='data:blog.url' property='og:url'/>
<meta content='Heargy da Best' property='og:site_name'/>
<meta content='Blog-Logo-Image' property='og:image'/>
<meta content='Your-App-Id' property='fb:app_id'/>
<meta content='http://www.facebook.com/hajizo' property='fb:admins'/>
<meta content='article' property='og:type'/>
Replace:-
Heargy da Best:- With Blog Name.
Blog-Logo-Image:- With Logo Image.
Your-App-Id:- With Facebook APP ID.
hajizo:- With Facebook Page Username.
So these settings will helps to debug webpage according to facebook graph APIs in better way.
Part 3:- Add Facebook Comment Box In Blogger Template.
- Go To Edit HTML section of your blogger template.
- Search By CTRL+F For <body> OR <body expr:class=’"loading" + data:blog.mobileClass’>
- Now Replace APP ID with yours from below given code.
<div id='fb-root'/>
<script>
  window.fbAsyncInit = function() {
    FB.init({
      appId      : 'APP-ID',
      xfbml      : true,
      version    : 'v2.7'
    });
  };

  (function(d, s, id){
     var js, fjs = d.getElementsByTagName(s)[0];
     if (d.getElementById(id)) {return;}
     js = d.createElement(s); js.id = id;
     js.src = "//connect.facebook.net/en_US/sdk.js";
     fjs.parentNode.insertBefore(js, fjs);
   }(document, 'script', 'facebook-jssdk'));
</script>
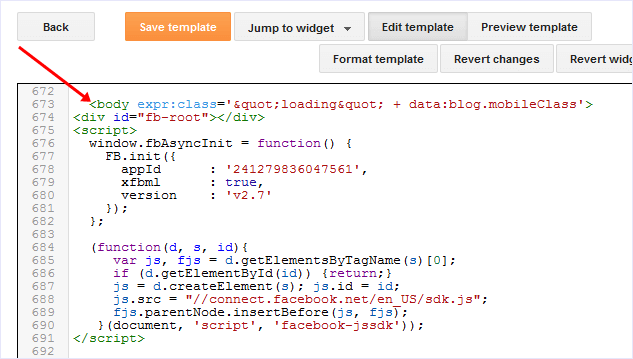
Copy above given code and paste it just below <body> OR <body expr:class=’"loading" + data:blog.mobileClass’> as shown below. or paste below <body>
Now search again by CTRL+F in template section for:
<b:include data='post' name='post'/>
Then Paste below given code just below the searched code.
<b:if cond='data:blog.pageType == "item"'>
<div style='padding:0px 0px 0px 0px; margin:0px 0px 0px 0px;'><script src='http://connect.facebook.net/en_US/all.js#xfbml=1'/>
<div>
<fb:comments colorscheme='light' expr:href='data:post.url' expr:title='data:post.title' expr:xid='data:post.id' width='600'/></div>
</div>
</b:if> After pasting both codes in accurate position. Simply save your template code.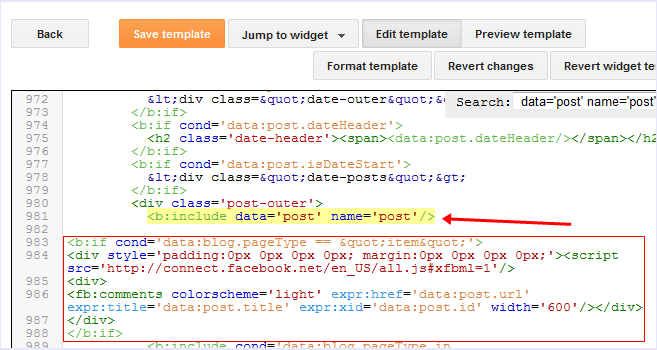
- Now Checkout any of your published post to check Facebook comment box is visible or not.
- In case you feel to adjust width of comment box then change values of width=’600′ according to your choice.
Part 4:- Steps To Hide Blogger Comment Box.
- If You want to hide your blogger comment box
- Then go Settings tab of blog >> Then Post and Comments
- Now Change Comment Location to Hide and then save settings.
In
conclusion, we hope this guide proves helpful to you. For any
assistance, questions or query, feel free to leave a comment below.
Share this guide with your friends as well.
Source: https://safetricks.org


2 Comments
Your article has piqued a lot of positive interest. I can see why since you have done such a good job of making it interesting. Audit Services Singapore
ReplyDeleteGreat info! I recently came across your blog and have been reading along. I thought I would leave my first comment. I don’t know what to say except that I have. Singapore Audit Company
ReplyDelete